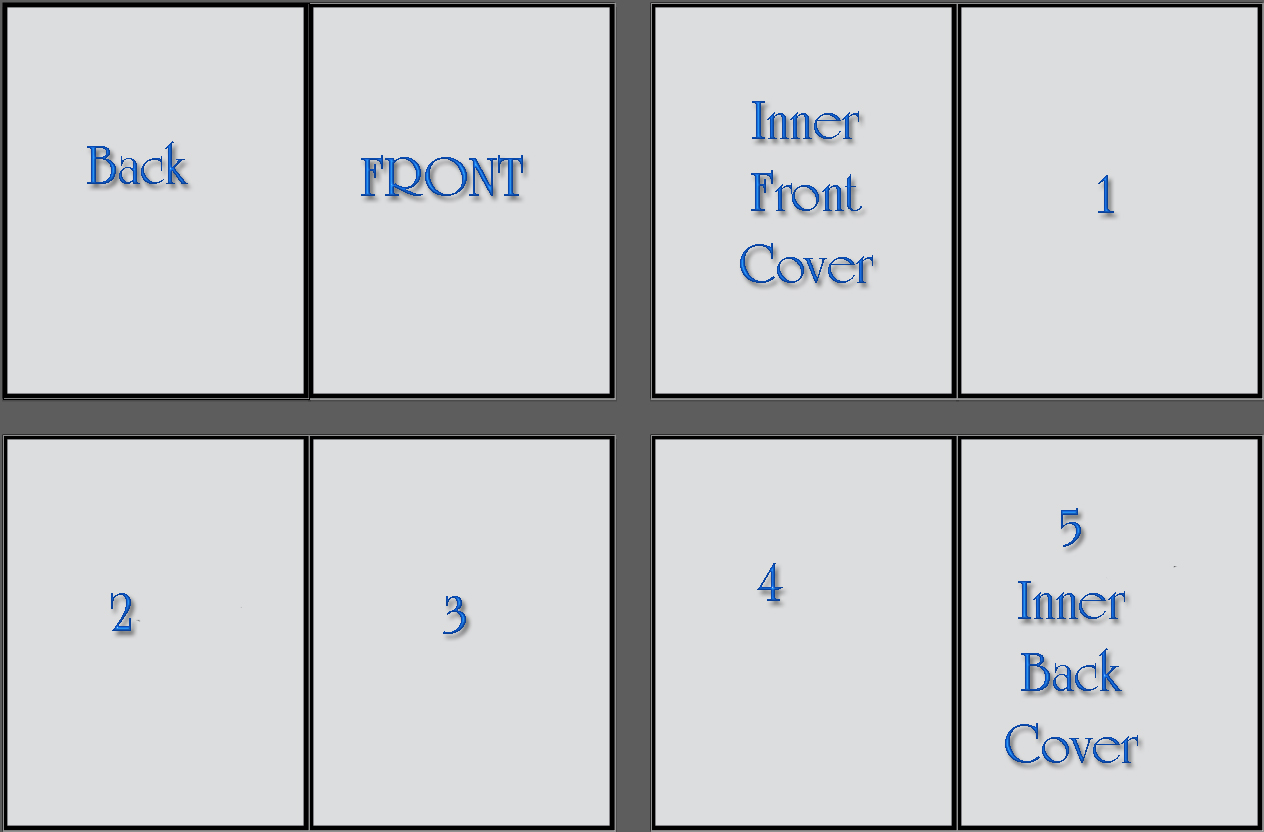
This is pretty easy after to do it a couple times. You will need to format your text editor to divide a page into segments. Here’s one example:
8.5 X 11 Page of paper
After you experiment a little, you will be able to make the appropriate changes to format your pages properly for your project. This is a fairly tiny book, of course, and uses just one sheet of copy paper to make an 8 page chapbook. This is perfect for haiku, or short poems. You will need to learn to fold the book properly. Here’s a video that shows you how (see below), and after just a couple tries, it really goes very quickly:
Folding an 8-page chapbook from one sheet
This is the no-software, no-staples booklet, and it’s a small miracle the first time it works. One sheet of letter paper becomes an eight-page booklet with a single cut and a few folds.
Fold the sheet in half the short way, then in half again, then once more. Unfold it. You now have eight rectangles marked by creases.
Fold the sheet in half the short way again and cut along the center crease from the folded edge to the middle, stopping at the center point. That slit is what lets it fold into pages.
Open the sheet back to a single fold the long way, so it looks like a long tent.
Push the two ends toward each other. The cut opens into a plus shape in the middle.
Press the four panels together so they fold into a stack of pages, then crease the spine.
Because the pages fold from one sheet, they don’t sit in plain order on the flat page. Lay out your text so each panel lands right side up in the finished booklet. Print one blank test fold, number the panels in pencil as you go, then match your layout to those numbers. After a try or two it’s second nature.
This tiny format is perfect for haiku or a handful of short poems. For larger booklets you’ll fold and staple several sheets instead, which the main guide and the format guide cover.
This tutorial is for magazines, but the technique is the same for chapbooks. Using Photoshop is an easy way to move elements around and create spectacular artistic effects in your chapbook. And, if you budget is tight, they have a free trial period for the software. You can probably complete your whole project for free if you get busy.
Using Adobe Photoshop for a chapbook
Photoshop shines when your chapbook leans visual: poems set over images, hand-lettered titles, textured backgrounds. It’s more work than a word processor for plain text, so reach for it when the look matters as much as the words.
Create a new document at your page size and set the resolution to 300 pixels per inch so it prints sharp.
Build one file per page, or use artboards to keep all your pages in a single document.
Keep every important element inside a safe margin, and leave the inside edge clear for the fold.
Use separate layers for the background, the image, and the text, so you can nudge each without disturbing the rest.
Set your poems with the Type tool, and keep the same font and size from page to page for a consistent feel.
Flatten a copy and export each page as a high-quality PDF or a 300 ppi image for printing.
Photoshop won’t arrange the pages for folding, so assemble your finished pages into a booklet order in a PDF, or hand them to a print shop to impose. If money is tight, Adobe offers a free trial, which is often long enough to finish a small project.
Adobe InDesign is probably the most powerful tool you can use to make chapbooks. This tutorial is a bit longer, but covers many of the key skills you will need to create your own project. There’s good news for people interested in using this tool, Adobe now allows you to lease the InDesign tool by the month, so it is very inexpensive to have access to this resource.
Laying out a chapbook in Adobe InDesign
InDesign is the tool professional presses reach for, and it handles booklet imposition cleanly. The learning curve is real, but for a booklet you’ll come back to, it’s worth an afternoon.
Start a new document at your page size, for example 5.5 by 8.5 inches, with Facing Pages turned on.
Set your margins, giving the inside edge a slightly wider gutter so text clears the fold.
Build the pages in plain reading order. Don’t try to arrange them for printing yourself; InDesign will do that.
Use a master page for anything that repeats, like page numbers, so it stays consistent.
Flow your poems in, one per page as a rule, and keep your title and body type consistent throughout.
When you’re ready, use File, then Print Booklet. Choose “2-up Saddle Stitch” and InDesign imposes the pages for folding automatically.
For a printer or a print shop, export a print-ready PDF (File, Export, Adobe PDF, the Press Quality preset) instead of printing straight from the program. Adobe leases InDesign by the month, so you don’t have to buy it outright to make one booklet.
Yes, you can use PowerPoint to make a great chapbook. In fact, some of the tools that come standard in Power point, like the templates, make it easy to produce a chapbook that has a lot of flair!
Making a chapbook in PowerPoint
PowerPoint isn’t the obvious choice, but it’s genuinely handy for a chapbook. Each slide is a page, you can drag text and images anywhere you like, and the built-in design tools give a booklet some flair without much fuss.
Go to Design, then Slide Size, then Custom Slide Size, and set it to your page dimensions, for example 5.5 by 8.5 inches.
Make one slide per page. Put one poem on each, with the title where you want it.
Use the alignment guides to keep margins even from page to page. Leave room on the inside edge for the fold.
Keep a title slide at the front and, if you like, a contents slide after it.
Watch your total page count, and keep it on a multiple of four for a folded booklet.
Export to PDF (File, Export, Create PDF) so the layout stays put when you print.
PowerPoint won’t impose the pages for folding the way Word’s book-fold or InDesign’s booklet feature will, so either print the PDF through a booklet-printing option in your print dialog, or hand the PDF to a print shop and let them impose it.
This video explains how to use Microsoft Word to format chapbook pages. Many people ask about this. In order to print a chapbook from a MS Word file, you must use the book layout, and set the appropriate margins as well as page size. Please be aware that Word files will look somewhat different from computer to computer, so it is advisable that you create the chapbook on the same computer you plan to print from.
Setting up a chapbook in Microsoft Word
Word has a book-fold layout built in that does the hard part for you: it arranges your pages so they print in the right spots to fold into a booklet. Here is how to set it up.
Open a new document and go to Layout, then the small arrow by Page Setup.
Under Pages, set Multiple pages to “Book fold.” Word switches to landscape and pairs your pages automatically.
Set Sheets per booklet to All, unless you’re making a very thick book.
Set your margins. Give the inside (gutter) margin a little extra, around 0.6 to 0.75 inch, so text doesn’t vanish into the fold.
Type or paste your poems, one per page. Use a page break to start each new poem cleanly.
Keep your total page count on a multiple of four. Add a blank page or two at the end if you need to.
When you print, choose two-sided printing and flip on the short edge. Run one test copy on scrap paper first and fold it to check the order before you print the whole run. As the video notes, a Word file can shift between computers, so lay out and print from the same machine when you can.